AutoLogger Manual
Learn how to install AutoLogger, access settings, personalize logging,
and use system tray functions for accurate workflow and project time tracking.
Installation Instructions
Follow these steps to install AutoLogger on your Windows computer.
- Save the AutoLogger setup file to your computer.
- Run the installation file.
- Install AutoLogger in the default folder:
C:\Users\USER\AppData\Roaming\AutoLogger\ -
Enable both recommended installation options:
Start AutoLogger automatically with Windows and
Add Microsoft Defender exclusion for install folder.

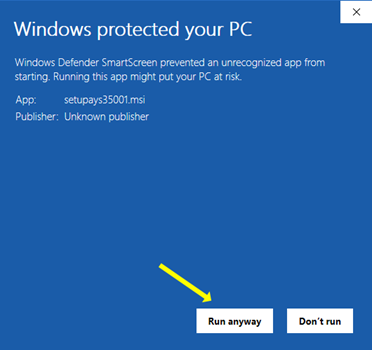
More info and then Run anyway.
Access Settings and Personalize Logging
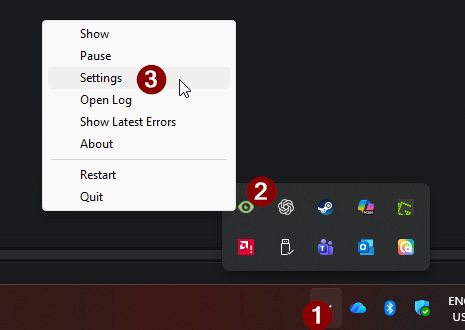
AutoLogger runs from the Windows system tray. Use the tray menu to open settings,
review logs, restart the app, or pause logging.
- Open the Windows system tray.
- Right-click the AutoLogger icon.
- Click Settings.
General Settings
The General tab controls snapshot frequency, excluded strings, monitored folders,
Windows startup, Outlook integration and project matching accuracy.
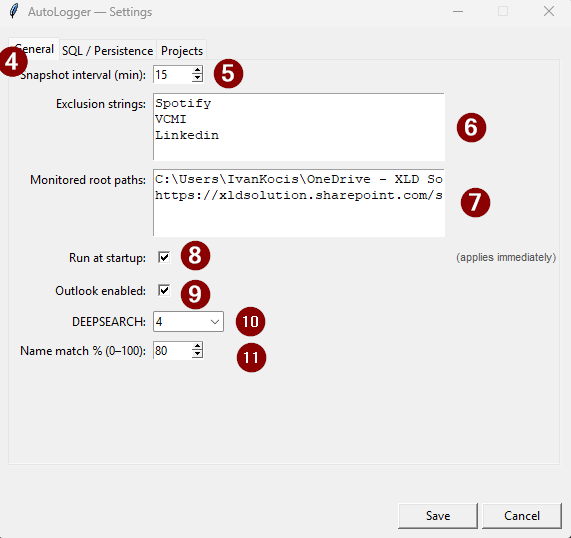
- General settings – Main tab for logging behavior.
- Snapshot interval – How often snapshots are taken. Default: 15 minutes.
- Exclusion strings – Add words, applications or websites that should be excluded from logging.
- Monitored root paths – Optional. Add root folders where your projects and project files are stored.
- Run at startup – Recommended. Starts AutoLogger automatically with Windows.
- Outlook enabled – Recommended. Allows AutoLogger to fetch calendar and email context.
- Deep search – How many subfolders should be checked inside monitored root folders. Recommended: 4.
- Name match accuracy – Minimum confidence level used to determine the project. Recommended minimum: 80%.
Saving Method Settings
The SQL / Persistence tab defines where AutoLogger saves your tracked data.

- SQL / Persistence – Settings for where tracking data is stored.
-
Log method: CSV or SQL
CSV saves data only locally in a CSV file inside the installation folder.
SQL saves data to the SQL database configured below, making it accessible in the cloud. - SQL server – Server address for the SQL database.
- SQL database – Database name where AutoLogger should write data.
- SQL table – Table name used for saved snapshots.
- SQL username – SQL login username.
- SQL password – SQL login password.
Restart from the tray menu to run AutoLogger with the new settings immediately.
Project Determination Settings
The Projects tab helps AutoLogger determine which client or project you worked on
based on file paths, window titles, email strings and calendar context.
- Project determination settings – Controls how AutoLogger classifies captured activity into projects.
- Client / project names – Optional. Add client or project names that should be used for determining which project you worked on.
- Own email domain – Add your own email domain so it can be excluded when fetching project names from email and calendar data.
-
Replacement rules – If captured strings match specific words, replace them with a clean project name.
Example: XLD_Accounting = B&A, Invoices.
If the captured string is Invoices, the saved project name becomes XLD_Accounting.
System Tray Functions
Right-click the AutoLogger icon in the system tray to access the application menu.
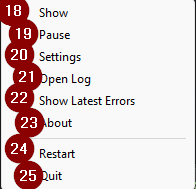
- Show – Shows the small AutoLogger window where you can leave a comment.
- Pause – Pauses logging. This stops saving new snapshots but does not quit the app.
- Settings – Opens the AutoLogger settings window.
- Open Log – Opens the app workflow log. This is technical app activity, not hour snapshot data.
- Show Latest Errors – Shows the latest errors if AutoLogger detected a problem.
- About – Shows application information.
- Restart – Restarts AutoLogger and reloads the latest saved settings.
- Quit – Quits AutoLogger for the current Windows session.
Recommended Setup
- Snapshot interval: 15 minutes
- Run at startup: Enabled
- Outlook enabled: Enabled
- Deep search: 4
- Name match accuracy: 80% or higher
- Use SQL if you want cloud-accessible data and integration with reporting or invoicing templates.